

Whew. Long time no see! Sorry if it seems I have left you behind, with my job at the shoe store and school, I don't have much time to do some crafting. Oh, by the way, if some of you wants to see my lousy progress as a CG artist at school, feel free to take a look here: it's in french, but it's mostly pictures and videos so you shouldn't have any problem understanding.
http://bartdelinterieur.blogspot.com/
Now that this has been taken care of, let's go back to our subject: the process of skinning, preserving and mounting an adult specimen of Rattus Norvegicus, or domestic rat. the whole process will be described with pictures after the jump, but not before since, y'know, rat guts.
Ok, so here we go! First of all, just to mention that the methods I describe can be used with any mammal up to the size of a large squirrel. Find your specimen any way you see fit, but make sure it is relatively clean, and free from holes (believe me, patching small holes is a pain.) I used a deceased male rat that belonged to a friend, who breeds these littles beasties as a hobby. (We go along pretty well; Feed 'em and I'll Stuff 'em!)

Once you have your specimen thawed if it was frozen, clean it up to make sure there is no dirt or fecal matter adhering to the fur. If possible, you should then plug the mouth, the anus and the urethra with a small piece of cotton. Afterwards, grab a scalpel; it is time for the incision! It should go from the beginning of the sternum, down to the genital area. Make sure not to go deeper than necessary; specially around the abdomen, since the digestive organs are kept behind very thin walls. You'll even see the guts through the flesh.


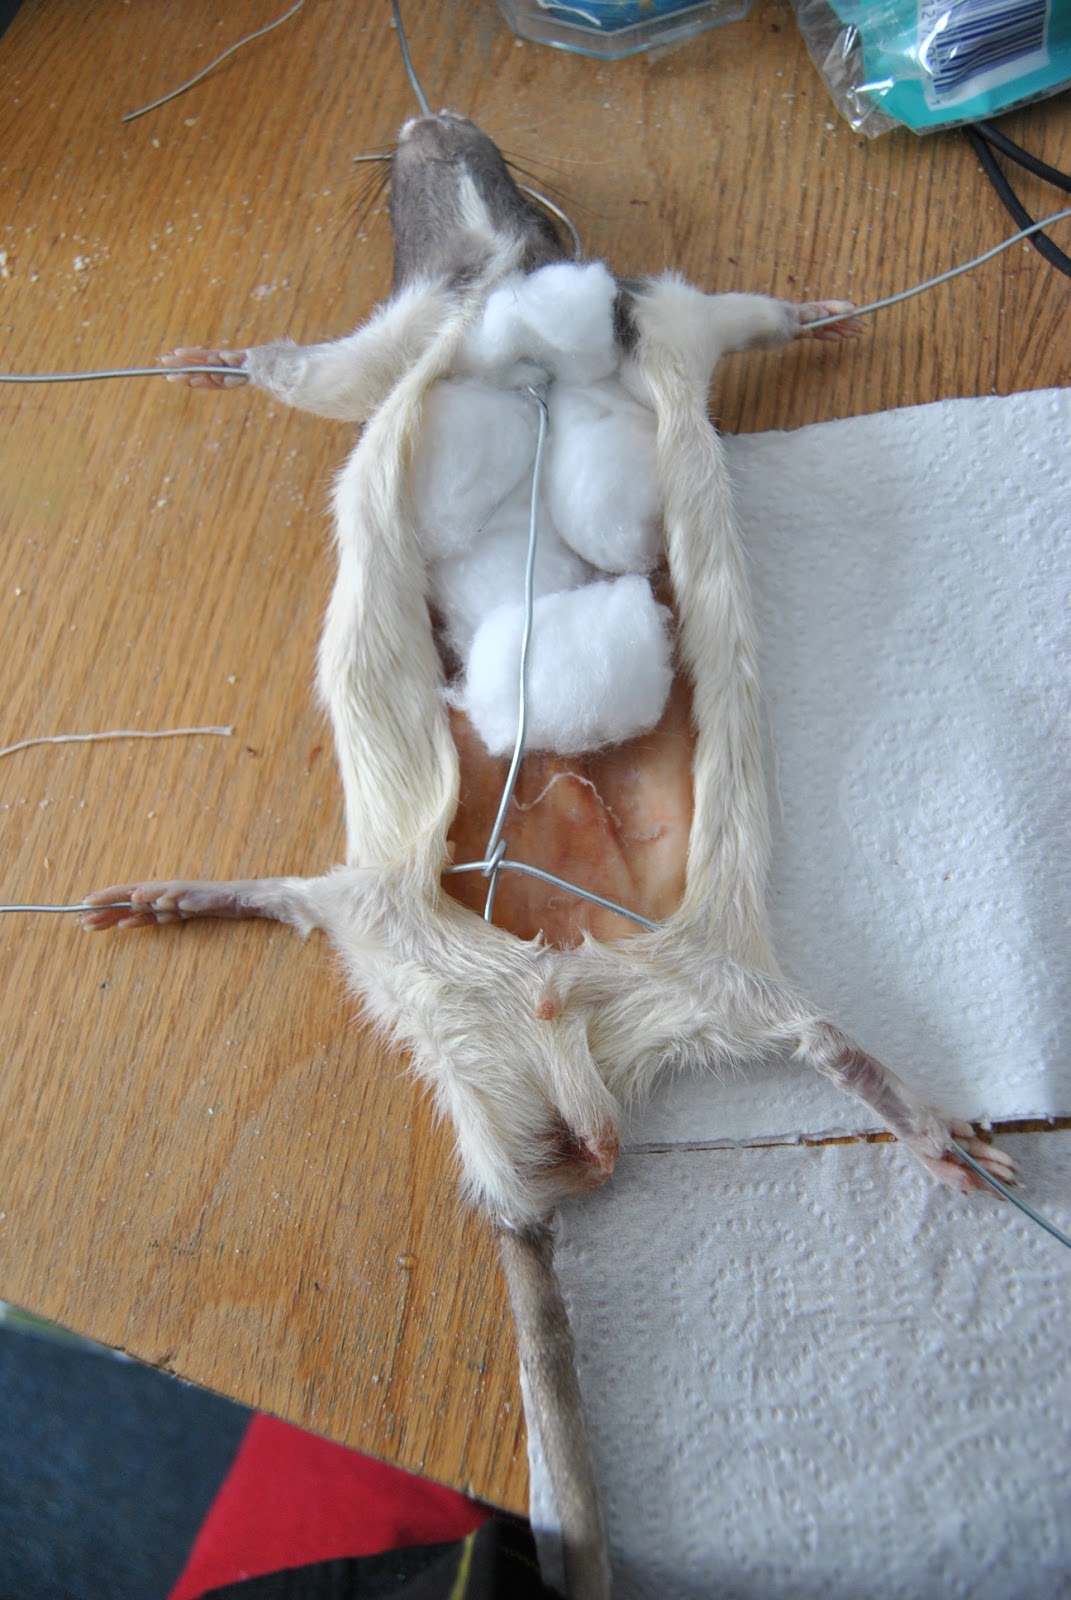
Once you've reached the paws, the trick is slipping of the skin as much as possible, like a glove, and then severing the bone just above the wrist/ankle. Afterwards, it is a matter of removing as much flesh as possible from the remaining bone.

If you have a male, you'll find the gonads to be a pain to remove from the scrotal sac. Take your time, once again. You don't want to pierce the organs, nor do you want to tear the scrotum.
For the tail, it's a bit tricky at first; in the case of bony-tailed animals, such as rodents, with a bit of elbow grease, the skin can be slipped right off. Be careful not to tear it, though. If you can't do it, slit underneath the tail and remove the skin the same way you did for the body.
The head is another thing; much care must be taken not to damage the ears. Cut off the ear canal as close to the skull as possible when you reach them. When you reach the eyes, take all your time and be carefull; it is easy to tear the eyelids. Same thing for the lips. As for the nose, with a small specimen like a rat, skin it until there is no bone underneath it, and sever the cartilage from the skull with a pair of plyers.

Once you're done, remove as much flesh and fat as you can from the skin, and clean it well using a soft, degreasing soap, such as dishwashing liquid. I like, afterwards, to let the skin pickle in a mix of 70% alcohol and Borax, which is a powder with antibacterian and deodorant properties, essential to the taxidermy process. I let the skin pickle for a few days, then rinse it again so it's nice & clean.
Afterwards, it is a good idea to rub the fleshy side of the skin with a mixture of salt and borax. This will help dry out the skin and will prevent bacteria from growing on it. If you feel like it, you can also use borax to fluff the fur. Helps making it fluffy & soft.
The next step is to stuff the head. The best method would be to boil the skull and clean it of flesh. Afterwards, use modeling clay to replace the fat & muscle, and insert the artificial eyes in the eye sockets, keeping them in place with more clay. It is then simply a matter of slipping the skull back into the head. In my case, I fell in love with the skull and wanted to keep it apart, so I simply sewn the lips of the rat together and stuffed the head with cotton balls.
The next step is to insert the spine wire; it should go from the mouth or nostril, down to the anus, or the tip of the tail, depending on your preferences. I went down to the tip of the tail so I had more stiffness and control in the final product.
After wards, insert more wire inside the specimen's feet, to replace the leg bones. twist the wires together to keep them in place.
Next comes the stuffing; If you want to good the traditional way, use Wood wool. Personally, I find cotton balls to be easier to work with.
(just a word, here; it is possible to construct or purchase a mannequin sculpted after the specimen's body; that way, one just needs to slip the skin over the form and sew it back together.)
When stuffing, don't leave any holes, but keep in mind that the skin shall eventually shrink while drying; thus, be careful not to let your specimen look bloated!


I like to sew the skin back up as I stuff it; makes the whole process less messy, in my opinion. Anyways, it is important to use a waxed thread to sew back your critter together; in the case of a white animal, waxed dental floss is perfect. As for the needle, I use an ordinary sewing needle, but with thicker skins, you might need something stronger.


The process is quite straightforward, stuff and sew until you're done! don't forget to put a few wisps of stuffing in the tail, which you should then sew back together if you had to make a slit to remove it. Oh, and fill up that scrotal sac, will ya? otherwise he'll look less like a handsome young ratty and more like his grampa. Once done, you should have what is basically a rat with wire sticking out of his extremeties. Feel free to brush the fur near the stitches to hide them as well as you can (a step I obviously suck at).


I then pin the ears to small pieces of cardboard so they can dry out completely unfolded; looks more alive that way.

While the eyelids were still soft, I inserted artificial eyes, which were basically laquered polymer clay balls. Using a glue such as contact cement and a toothpick, replace the eyelids in a natural pose over the eyes. Usually, you should insert the eyes inside the head form, but since I only stuffed the head without using any pre-sculpted form, I prefered to install them at the end of the process.

If necessary, prepare your mount's support; I used a cheap plywood base bought at the dollar store, stained and varnished.

You're done!


What a fantastic and useful tutorial. Thankyou very much for posting it. My beloved gerbil Rufus is not long for this world and I would like to preserve him in a similar manner :)
ReplyDeletelovely job on that rat! love that you put the skull with the skin. i've always wanted to try this, but haven't been able to find anything "fresh" enough to be in decent enough shape.
ReplyDeletedid you ever dissect the organs out for funsies? it would be cool to preserve the brain/heart in little jars. THEN YOU'D HAVE A WHOLE SET.
Thanks guys!
ReplyDeletePurky: I truly hope for the best for your friend, and if you end up making yourself a nice 'lil keepsake, make sure to share a picture of the results!
Ahna: Make yourself friend with a breeder ;) helps bunches! or if anyone in your family is a hunter, using their catches to practice taxidermy makes wonders at minimizing waste.
I tried to preserve rat guts before, but it didn't work quite well; there wasn't any rot or mold, but the softer organs were eroding and turning to mush. If I had access to formaldehyde instead of using alcohol, it might help "fixing" the tissues, though!
BTW, I was wondering, since you are biology student, maybe you could suggest me a few good reads or tips on how preserving soft tissues? I love the look of a shelf stocked with creepy bottled things, but wouldn't know my way around making those work.
Hmm you're asking a relatively poorly informed bio student here, but what little I do know is this:
ReplyDeleteBigger insects/organs/animals should hold up pretty well in ethanol(I think it's a 70% solution). Formaldehyde seems like a better way to go but I've never gotten my hands on any! I've used ethanol to preserve flowers and it worked really well aside from the color drainage, but they look all ghostly now and that's nice in itself. There was no disintegration with the flowers at all. I've also used ethanol to preserve some animal guts before and that worked ok too, but did result in some minor disintegration.
I've heard about "fixing" your specimens first in a formaldehyde solution and then going ahead and putting them in ethanol. Since ethanol dehydrates whatever it is your preserving, the formaldehyde should help stabilize it first.
So I guess if you can't get formaldehyde,you kinda cant lose by at least trying ethanol? Did you use a different kind of alcohol before? How sad to have your stuff all mushy :(
Oh! Also I found this:
ReplyDeletehttp://www.loris-conservation.org/database/wild_survey/necropsy/Collections.html
That should be a little more helpful than I am haha.
Thanks for your reply!
ReplyDeleteI should try out ethanol, maybe it would work better than what I used (isopropyl alcohol) since, y'know, isopropyl alcohol is used as a degreaser & cleaning solution. Probably not the best to keep a liver intact.
I'll try to find ethanol and see what I can do with it!
Also, I read the link you posted, very helpful! as I've seen I probably should have used a stronger concentration of alcohol, and they recommend the removal of the intestines, which is exactly what I was hoping to preserve in the first place, oh well.
I have the rat's brother in my freezer, I'll try again once school's over!
Oh my, I just realized that finding ethanol is as simple as buying a bottle of everclear. Damn. Easier than I thought! yep, so next time, I'll def. use that instead of isopropanol.
ReplyDeleteYeah my sister and I tried isopropyl alcohol, and it fucked our shit up. Live and learn, then buy everclear?
ReplyDeleteSomething like that.
Hey thanks alot..I learned a lot from that conversation
Deletehow kill my rabbit pet?
ReplyDeleteDon't. Just don't. Wait until your rabbit dies then taxidermy it. If you really don't want your rabbit anymore, find a sanctuary or a rescue.
DeleteHow do you hide the wires so well? Amazing work, I've saved this page as a reference because I've finally worked up the courage (and supplies heh) to work on some specimens I have and it has been my favorite guide.
ReplyDeleteHow did you clean out the tail while keeping it intact? I have a tail of a rat I would like to preserve, but I don't want to have to cut it open at all
ReplyDelete