The hand of Glory is finally finished, looking all pretty in its shadow box, and ready to... hang! (BWAHAHAHAHA! HANG! like, it's already been hung? y'know, hand of a hangman? no? someone?)
If you stumbled here first, I strongly recommend you to read Part 1 of this tutorial, 'cause we're jumping to the finishing touches right after the break!
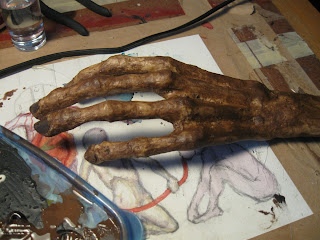
Now, if you remember well, last time we worked on that hand it looked like this:
Definitely the shape of a corpse's hand, but something's missing, and we all know what it looks like right now.
What's missing to up the realism factore is fingernails. Of course.
To make those, I first started working with an empty dish soap bottle.
I cut small nail shaped pieces from there, but ended up finding them too thick. So I did the same thing with a random, thinner plastic container I had lying around. Once the nails were cut and curved to the correct shape (after heating the plastic), I simply glued them to place with my trusty hot glue gun.
As you can see, they look like they're floating on the fingers, but that's ok, since we have one last layer of TP+latex/glue mush to add to it.
Here it is after sculpting the new layer of latex mush correctly. Much more natural looking.
I covered the whole hand, and made some small tears and holes in that final layer, to get a wrinkly, rotting look. I then let the whole thing dry.
Afterwards, it was time for paint!
I used good ol' craft paints, burnt sienna, black & yellow to be exact, with a tad of liquid latex (substitute your adhesive of choice) so I'm sure it bites down correctly on the hand.
I then started applying the paint, getting sure to get it in every nook and cranny, and rubbed off the excess with a cloth, just like when you're staining wood. Wood stains actually work real well for that purpose, but I didn't have any suitable for the job lying around.
And now it looks like a turd.
So I did a second layer.
After the second layer, it's still quite turd like, but that's because it looks fresh & new & shiny.
Our job is now to make it look like it hung out for a few centuries in a dusty cellar.
For that purpose, the best is to use ash. Like, from a fireplace or a wood stove.
However, living in a tiny studio appartment in a very busy, very old neighborhood, I couldn't actually light myself a bonfire, so I dragged my fancy city-boy ass to the nearest art supply store, and bought powdered pigments. In this case, powdered charcoal and powdered yellow ochre. I mixed a small amount of those with baby powder, making for a nice, dusty colored powder.
However, living in a tiny studio appartment in a very busy, very old neighborhood, I couldn't actually light myself a bonfire, so I dragged my fancy city-boy ass to the nearest art supply store, and bought powdered pigments. In this case, powdered charcoal and powdered yellow ochre. I mixed a small amount of those with baby powder, making for a nice, dusty colored powder.
I then simply brushed it on with a powder brush, the kind used to apply blush or foundation, and brushed off the excess with a horse hair shoe shine brush and a damp cloth.
Look at that nice, dusty old look... hey, is it just me, or it's kind of shiny?
AAAARGH! (Or more accurately, TAB**NAK! as we say around here.) I accidently bought powdered black graphite instead of powdered charcoal. Took the first black powder I saw, my bad. Oh well. Once behind glass it shouldn't show too much.
In those last three pictures, you could see shots of the stump. I simply ripped off the excess newspaper "forearm bones" and the excess latex skin, and painted the resulting area dark brown, followed by a bit of my gray powder. It's not fancy, but we won't see it much anyways inside the shadow box.
You can also see a closeup of the nails; I cleaned those a bit with a damp rag, and then applied a coat of satin varnish to give them a natural sheen.
I hot glued the hand on a piece of felt covered board...
...I made myself a label, and slapped the whole thing inside the shadow box. I won't go in detail here about that, since I already covered the whole process HERE.
And then, the hand of glory was done.


It's turned out really well. I especially love the fingernails. In the past I've always used laminated paper and painted them, and they've turned out okay, but this technique looks like it's easier and gives a better result. The heat discoloration is perfect.
ReplyDeleteThanks!
ReplyDeleteAlthough I really like the color the heat gave to the nails, I got lots of trouble getting the curvature and size right. Next time I think I'll just buy fake nails and paint them to my tastes!
I saw this on good ol' propnomicon. Great work man. I like the use of the powder pigments.
ReplyDeleteThank you! I used those because I didn't have access to ashes, which is an even more efficient and quite cheaper method. Fuller's earth, if you can find it, works wonders also!
Delete