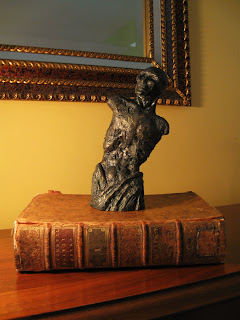
If you looked through my whole blog, or have been following me for quite some time, you might remember about the Transi, a small figure I sculpted in oil-based clay a while ago. Well, to put things plainly, I fucked up. My plan was to mold the sculpture in a latex skin, then create a plaster mother mold over it; bad idea. Latex will have a hard time curing when it's brushed on oil based clay. I should have made an alginate mold, then a resin or plaster cast, and THEN create the latex mold over the resin or plaster copy.
But what is done is done; I acted without thinking thoroughly and ended up with a sloppy mold, on which lots of detail was lost, and the original sculpture isn't in good enough condition to create another mold.
I wasn't going to let all this work go to waste, though. Thus about two days ago, I decided to try casting a plaster copy using the crappy mold I made. The casting process went absurdly well considering how bad I am at making molds & casting stuff. If it hadn't be for the poor quality of the latex impression, I would have had a perfect copy of the original sculpture.
Here's what I ended up with:
Lots of the original details have been lost and the copy is covered in bubbles, cracks and what not. I didn't know what to do with that; I first thought about simply aging the plaster copy and call it a day, buuuut after reflexion, I decided to try my hand at creating an antique bronze faux-finish.
Once the plaster was flint dry, thus, I mixed gold paint and burnt sienna paint together to get a copper-ish color, and diluted it with pleeenty of water; the plaster being very porous, using a watery paint is the best way to cover it. I then coated the cast completely. The fluidity of the paint and the absorbent nature of the plaster made it very easy to get into all the holes and crevices.
Once dry, all was left to do is create a patina to give the illusion of old, weathered bronze.
For this, I added a small amount of sap green and burnt sienna paint to india ink, and once again diluted this mixture with plenty of water. On this picture you can see how the patina makes the details jump out:
Covering the whole sculpture took a matter of minutes; the patina flowed in every nooks & crannies, darkening the details of the cast.
It's not looking thaaat good yet, though, as you can see. All that's missing is a few verdigris washes for that little touch of authenticity. For this, I mixed sap green, cobalt glue, and titanium white paints together, and diluted it with the ink-tainted water I used to clean my brushes. This gave me a very nice grayish turquoise that I let flow into the cracks and dripped all over the plaster. I then let clean water drip over the head & shoulders of the sculpture to complete the weathering. Here are the results.
All that is left to do is find a nice polished wood base on which to attache the sculpture, and it will then be ready to show off on my bookshelves.
Dashing Through the Snow
1 day ago


Damn. That is amazing!
ReplyDeleteThank you so much!
ReplyDeleteYou’ve got some interesting points in this article. I would have never considered any of these if I didn’t come across this. Thanks!.alginates
ReplyDelete